Description
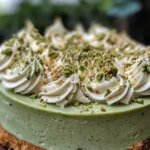
Indulge your senses with the Heavenly Delight Pistachio Cheesecake, a creamy and nutty dessert that promises pure bliss. This irresistible cheesecake combines the rich, creamy texture you love with the delightful crunch of pistachios, making it a true treat for any occasion. Perfectly balanced and full of flavor, it’s a dessert that stands out. Eager to whip it up at home? Click to explore the full recipe and bring a slice of Heaven into your kitchen today!
Ingredients
- 1 ½ cups crushed pistachios
- ½ cup unsalted butter, melted
- 2 cups cream cheese, softened
- 1 cup powdered sugar
- 1 teaspoon vanilla extract
- 1 cup heavy cream
- 1 tablespoon lemon juice
- ½ teaspoon salt
- ½ cup pistachios, chopped (for garnish)
Instructions
The foundation of your Pistachio Cheesecake is crucial. Preheating the oven sets the stage for consistent baking. As you crush the graham crackers, let yourself enjoy the simple joy of the task. After mixing the crumbs with melted butter and sugar, firmly press the mixture into the springform pan. The key is to compress it well, ensuring a solid crust that holds together after baking.
When mixing cream cheese and sugar, aim for a light and airy texture. Remember to scrape down the bowl to ensure every bit is mixed perfectly. The addition of eggs is another moment of magic—watch as the mixture transforms. Incorporating vanilla and pistachios not only enhances the flavor but also adds beautiful green specks throughout your cheesecake.
Pouring the filling over the prepared crust is where anticipation builds. Make sure the mixture is evenly distributed to avoid any uneven slices later on. Tapping the pan is a small but necessary step to achieve that perfect, smooth finish.
As the cheesecake bakes, enjoy the sweet aroma filling your kitchen. Watching it rise in the oven is thrilling! Remember, it might not look perfect at first, but the cooling process works wonders—just let it be.
Once out of the oven, exercise a little patience. The cooling period allows the flavors to meld and the texture to achieve that required creaminess. Running a knife along the edges is essential so the sides of the cheesecake don’t stick, ensuring a beautiful presentation.
The final reveal! As you slice into the Pistachio Cheesecake, notice the smooth, creamy texture. Each slice should look inviting—adorn it with whipped cream or pistachios to elevate its appearance. Take a moment to appreciate your hard work, and enjoy sharing this delightful treat!
Notes
Perfect Pairings
Consider serving your Pistachio Cheesecake with fresh fruit, such as raspberries or strawberries. Their tartness complements the creamy, nutty flavors beautifully.
Storage Tips
To maintain freshness, store leftover cheesecake in an airtight container in the refrigerator. It’s delicious cold and can last up to a week!
Customizing Flavors
Feel free to explore flavors by adding different nuts or a hint of lemon zest to the cheesecake batter. Each variation can infuse your creation with a personal touch.
- Prep Time: 20 minutes
- Cook Time: 60 minutes
Keywords: Pistachio Cheesecake