Description
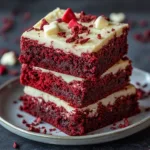
These Red Velvet Brownies are rich, fudgy, and have the perfect balance of chocolate and vanilla flavors with a gorgeous red color. Topped with a luscious cream cheese frosting, they’re irresistible!
Ingredients
- 1 cup of all-purpose flour
- 1/2 cup of unsweetened cocoa powder
- 1 cup of sugar
- 1/2 cup of butter, softened
- 2 large eggs
- 1 tablespoon of red food coloring
- 1 teaspoon of vanilla extract
- 1/2 teaspoon of baking powder
- 1/2 teaspoon of salt
- 1/2 cup of cream cheese, for frosting
- 1/4 cup of powdered sugar, for frosting
Instructions
Begin this delightful journey by preheating your oven to 350°F (175°C). This step is crucial as it ensures the brownies bake evenly, delivering that perfect gooey texture. Don’t forget to grease your baking pan with a bit of butter or cooking spray—this small act will ensure your brownies slide out easily once they are baked to perfection.
Grab a mixing bowl and combine the melted butter and sugar; whisk them together until you achieve a smooth mixture. Then, add in the eggs, one by one, and stir vigorously. This process is about creating a luscious base for your brownies. Don’t rush! Take your time to blend in the vanilla extract; its delightful aroma will elevate this batch to a whole new level.
In a separate bowl, whisk together the flour, cocoa powder, and salt. Gradually add this dry mixture to your wet ingredients. Mix gently! The goal is to combine these elements without over-mixing. You want a thick, velvety batter that will give your brownies that signature red velvet texture.
This is the moment when your brownies transform! Add the red food coloring to your batter and gently fold it in. Watch as your mixture turns a vibrant shade of red. It’s a visual treat! If you’re feeling adventurous, consider adding some white chocolate chips for an extra layer of flavor—just fold them in lightly.
Pour your rich, red batter into the prepared baking pan, spreading it evenly with a spatula. Slide it into the preheated oven and let the magic happen! Bake for around 25 to 30 minutes, but be vigilant. The brownies are done when a toothpick inserted in the center comes out with a few moist crumbs.
Once baked, remove the pan from the oven and let the brownies cool in the pan for about 10 minutes. The anticipation will be worth it! Carefully lift them out and place them on a wire rack to cool completely. You can cut these beauties into squares while still warm or wait until they are room temperature for perfect slices.
Notes
Let It Cool
Allowing the brownies to cool not only prevents burns but also ensures that they set properly. This results in the fudginess that is so coveted in brownies.
Storage Tips
To keep your brownies delicious for longer, store them in an airtight container at room temperature. They can also be refrigerated for a longer lifespan, but be prepared for them to be slightly firmer.
Customization Options
Feel free to experiment! Adding nuts can give a delightful crunch, while a sprinkle of sea salt on top just before serving can enhance the chocolate flavor beautifully. Make it your own!
- Prep Time: 15 minutes
- Cook Time: 25 minutes